Air Pressure Curriculum
Section 3—Lesson 9: Relational Causality and Bernoulli's Principle
Lesson Plan
Materials
One set of materials per student:
- Scrap paper
- Straw (optional)
- Tape
- 2"x 8 1/2" strips of paper
- Scissors
- Ruler
- Lift: Bernoulli's Principle activity sheet, 1 per student (PDF 7 KB)
- Mapping Out Relational Causality in Lift sheet (PDF 10 KB)
Prep Step
- Review the lesson plan, background information, and understanding goals.
- Photocopy the activity sheets, Lift: Bernoulli's Principle and Mapping Out Relational Causality in Lift.
- Photocopy the sheet, The Causal Story of Lift (PDF 19 KB).
Analyze Thinking
Step 1: Focusing on Current Thinking
Provide each student with a piece of paper and a Lift: Bernoulli's Principle activity sheet. Explain that they will be folding the paper in half like a tent and blowing under it. Ask what they think will happen. They should write their predictions on the activity sheet.
RECAST Thinking
Step 2: Experimenting With the Paper Tent
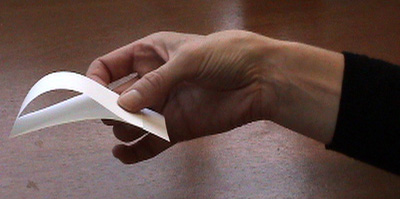
Have each student fold the piece of paper in half. Then have them place the paper like a tent on a smooth surface. Have them blow under it (they can use a straw if they wish). What happens? Have them test what happens multiple times.
Have the students draw a model to explain how the air moved through the paper to flatten it, and why they think this happened.
Bring the class back together to discuss what happened:
- Ask, "Was the result of your experiment what you had expected?" "Does the paper move toward or away from the fast-moving air?"
- Ask a few students to put their models on the board and to explain them.
- Discuss responses from the class, noting why the student predicted as he/she did in each case.
- Tell the class about Bernoulli and his principle. Daniel Bernoulli, a famous scientist in the 1700's, studied fluids (anything that flows) such as air and water. He designed a principle to explain the effect of motion on fluid pressure. What Bernoulli found was that as the speed of a fluid increases, the pressure in the fluid decreases. So faster-moving air exerts less pressure than slower-moving air.
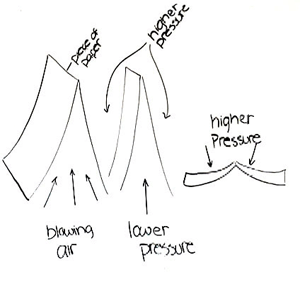
- Ask, "How does this explain what is going on?" (The paper gets flattened instead of blown away. Why? Because there is a difference in pressure. When you blew under the piece of paper, you made the air move faster, and decreased the air pressure. The air pressure on top was greater than the air pressure underneath. The paper was pushed toward the faster-moving, lower-pressure air.)
Step 3: Discussing Whether Students Think That Bernoulli's Principle Makes Sense and is Plausible
Engage the students in a conversation about Bernoulli's principle. Try to find out if your students: 1) understand what it says, so that they know how to interpret it and 2) find it to be believable.
- Ask, "Do you understand what Bernoulli's principle says? Does it make sense to you?" Have some of the students explain it back to you using their own words. Probe students' conceptions and try to clear up any misunderstandings.
- Ask, "Do you believe what Bernoulli's principle says? Why or why not?" Gather arguments on both sides of the issue. If no one questions Bernoulli's principle, play devil's advocate and encourage them to grapple with the question of how faster moving air could exert less pressure. Encourage them to think about instances when they have experienced faster moving air (in a car, a windy day, hurricanes, and so forth). Does it seem to exert less pressure?
- Once students have recognized the discrepancy between their own experiences and what Bernoulli's principle predicts, ask if anyone can resolve the discrepancy. Gather students' ideas.
- Have the students step back from considering Bernoulli's principle and think about what causes the wind. Air is moving from areas of higher pressure to areas of lower pressure. Air pressure is omni-directional and exerts a push in all directions. However, the effect is wind, which moves quickly in a specific direction from areas of higher pressure to areas of lower pressure, and which is forceful in the direction in which it is moving. Through discussion and the use of models (student drawn and teacher drawn), help students to see the role of pressure (in causing winds) and of force (as the effect of the direction of the wind), and to differentiate between the two. Then come back to Bernoulli's principle. Encourage the students to see that the faster moving air pushes more forcefully in the direction that it is moving, but not in other directions. Here pressure is omni-directional and lower than slower moving air.
Step 4: Experimenting With Airplane Wings
What does Bernoulli's principle mean for flight? Provide each student with a 2" x 8 1/2" strip of paper. Have each student:
- Fold the strip of paper in half. Tape one edge 1" from the other edge so that one side curves out.
- Insert a ruler and blow directly at the folded part. What happens? Does the paper wing move toward the flat part or the curved part?
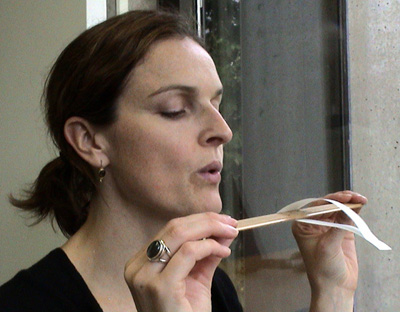
- Experiment with different shaped wings. Try to make different amounts of curve in the wings.
Ask the class, "Why are airplane wings curved on the top? What would happen if they were curved on the bottom instead? Does the shape of the wing affect the way that it reacts to air pressure?" (Air has to travel farther over curved surfaces than straight ones. The air traveling over the curved surface travels faster than the air moving over the straight surface. Therefore, the air moving over the top exerts less pressure than the air moving underneath the wing, so the wing moves up.)
Have the students draw a model to explain how the air moved in relation to the wing. If you have time, you could have a student put their model on the board to discuss, or place your own on the board for the students to compare.
Explore Causality
Step 5: Reflecting on What Happened Using Relational Causality
Engage students in a discussion about how the paper tent and the airplane wing are similar. (When students blew inside the paper tent, they noticed that the paper flattened. By increasing the speed of air, they decreased the pressure. Therefore, the paper moved towards faster moving air. This was similar to the airplane wing. It "lifted" towards the lower pressure.)
Ask:
- "Can you explain, using relational causality, why the paper tent flattened? If so, how? If not, why not?"
- "In what way is using relational causality helpful in this context? What is difficult to understand, either in terms of pressure differentials or relational causality?"
- "Does this example of relational causality make sense? If so, why? If not, why not?"
- "Do other students seem to have similar understandings of relational causality in this case? How do other students' ideas compare to yours? How are they similar? How are they different?"
- "How does the use of relational causality compare to other examples you've thought about? That is, how is it similar to other examples? How is it different?"
Step 6: Thinking About the Causal Story of Lift
Pass out the sheet, The Causal Story of Lift. Read and discuss it together. Stress that in order to have lift, the pressure on the top of the wing must be lower than the pressure underneath the wing. One factor alone does not cause lift; it is caused by a relationship between the two pressures.
Step 7: Mapping the Relational Causality Involved
Have students complete the activity sheet, Mapping Out Relational Causality in Lift. Review the activity sheet with your students, making sure that they understand how relational causality is involved in lift.
Review, Extend, Apply
Step 8: Making Connections
Ask students to come up with other examples where Bernoulli's principle applies. They may not realize just how common it is. Try to generate a diverse list to offer a sense of its ubiquity. Discuss with the class which cases involve relational causality. Here are some examples:
- A fast-moving truck passes a car on the highway and the car is pulled towards the truck.
- When you turn on the water in the shower, the shower curtain immediately gets "sucked" into the shower and sticks to your legs.
- It is a very windy day. You push the front door closed with the same amount of force that you usually apply, and it slams much harder than you expect.