
Simple Circuits Curriculum
Section 3: Lesson Plan
Materials
- "D" cell battery, 1 per pair of students
- Wire, (insulated copper wire with plastic coating, apx. 6 inches long with copper ends exposed), 3 per pair of students
- Flashlight bulbs, 1 per pair of students
- Bulb holders, 1 per pair of students
- Battery holders, 1 per pair of students
- Re-sealable plastic bag for insulation/conduction test. 1 bag per pair of students filled with the following items:
- Toothpick
- 1" piece of straw
- Paper clip
- 1" x 1" piece of aluminum foil
- Wooden pencil stub sharpened at both ends
- Marble
- Piece of paper
- 1" piece of chalk
- Brass paper fastener
- Penny, dime, nickel, and quarter
- 1" x 1" piece of plastic screen
- 1" x 1" piece of aluminum screen
- Styrofoam peanut
Prep Step
- Review the lesson plan, background information, and understanding goals.
- Gather items for the insulation/conduction test.
- Create a set of testing materials for each pair of students by bagging together each of the items.
- Photocopy the sheets, Predicting Conductors and Insulators, 1 per pair of students. (PDF 86 KB)
Analyze Thinking
Step 1: Revealing Current Thinking
Have students put the configurations of the four models that they worked on from the previous lesson on the board. Discuss what is similar and different about them. Also, ask a few students to explain what their explorations were like. What are some of the first things they tried? What did they learn from it? What are some of the later things that they tried and what made them decide to try these things?
Ask, "Do all things let electrical current flow move along them?" Another way to ask the question is, "Do all things allow their electrons to move easily?" Have each student record some thoughts in their journal and give examples before opening up group discussion. So far, we have mostly talked about the role of active causes in how a circuit works, such as electrons that move. However, as this lesson will show, some variables are part of the causal story but are passive causes.
Have students share their ideas. The activity that they do in this lesson will either support or challenge their current ideas.
RECAST Thinking
Step 2: Testing Whether Different Materials Affect Current Flow
Have students work in pairs to experiment with a variety of materials to discover their level of conductivity. (For this lesson, students group the materials as conductors or insulators, but in the next lesson we'll begin to talk about conduction on a continuum.)
Pass out the sheets, Predicting Conductors and Insulators, and the bags filled with testing materials to each pair of students. They will record their findings on the handout, or they can set up a recording sheet in their journals.
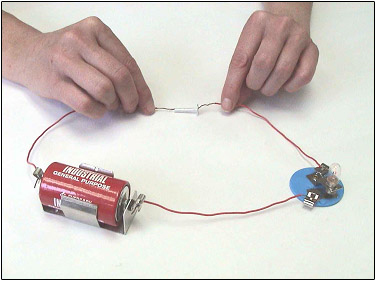
Demonstrate to the class how to set up a tester. Explain that in this activity, they will be using a bulb holder and a battery holder. The holders don't do anything besides help to hold the wires in the right places so that the students don't have to. (As they saw in earlier lessons, you don't have to have a bulb holder or a battery holder to make the bulb light.) The tester should have one wire coming from each end of the battery. One of those wires should go directly to the bulb holder. A third wire should extend from the bulb holder. When they test an item, they will hold it between the two wires with free ends (one coming from the battery holder and one coming from the bulb holder). In order to make sure that they have set their tester up correctly, they should test it by touching the two loose wire ends together to make sure that the bulb lights.

Example of a Tester
Students should work through the objects systematically. For each one, they should first predict what they think will happen and record their prediction on the recording sheet. Then they should check the conductivity of each material by placing it between the ends of two wires as part of a circuit to try to light the bulb. They should record their finding on their recording sheet.
Checking the Conductivity of the Testing Materials
Step 3: Making Generalizations
Afterwards, have students summarize what they found out. Review each of the materials on their list. Students will have noticed that in some cases the bulb lit and in some cases it didn't. When it did light, it was brighter with some materials than with others.
Some materials are more conductive than others. We call these conductors. Materials that are not very conductive are called insulators. Explain that this has to do with how the material is bonded and how easily electrons can move within it.
Explore Causality
Step 4: Introducing Passive Causality
Often, when we think about causality, we think about cases where there is a clear agent in a causal relationship, such as the electrons. It can be harder to realize the role of variables that are, in some sense, passive. The variable of material type plays a passive causal role in relation to conduction and insulation. However, as the testing of materials above indicates, the type of material plays an important role in current flow. Here is an analogy. We think of a train as the way that we get places, but in order to get somewhere we also need train tracks, bridges to get across rivers, etc. These things aren't active in their role, but they are critical to the outcome.
Review, Extend, and Apply
Step 5: Making Connections
Ask:
- If only some materials conduct electricity, why is it possible for humans to get a shock? See what your students think. Our bodies contain a lot of water and salt. These substances are very conductive.
- If only some materials are conductors, how could lightning hitting telephone wires result in you getting a shock from your plastic telephone? Discuss how the amount of force behind the electrons makes a difference. With enough voltage, even the most tightly bonded electrons can be made to move. Voltage is the amount of push that the electrons "behind" any given electron can deliver. This means that anything, even things that we call insulators, can conduct electricity if there is enough force. However, it is also the case that electrons tend to move down the "easiest" or most conductive path when there is one for them to go to. That is why lightning, which has extremely high voltage, choose certain paths over others. The electrons will take the path of least resistance.
In order to prepare for the next lesson, ask students to take a look around their homes for different types of bulbs. Have them try to find a few different kinds and see if they can see what each looks like inside. They should make a quick sketch of each type they find.
Warning: Tell students not to touch the bulbs that they find around their homes while lit. If they want to take them out of a lamp, they must unplug it first and put the bulb back in before they plug it in. Also, they need to be careful not to break the glass of the bulb.