
Density Curriculum
Section 1—Lesson 2: What Are Some Models That Help Us Think About Density?
Lesson Plan
Materials
- Wooden balls
- Glass marbles
- Equal sized clear plastic jars or cylinders
- Dots-Per-Box posters or overhead (PDF 498 KB)
- Loaf of squishy white bread with a few holes poked into the bag to let air escape when you push it down (one for each class)
- Individual white boards and markers for each student. (You could substitute paper and pencils, but the white boards work well for revising ideas.)
- Balances (optional)
Prep Step
- Review the lesson plan, background information, and understanding goals.
- Gather materials.
- Photocopy or make an overhead of Dots-Per-Box sheet.
Analyze Thinking
Step 1: What is a Model?
Remind your students about when they drew models to explain why two cylinders felt different. Explain to them that you going to share a few other types of models that might be helpful for them to think about what is going on.
Ask your students what a model is. Gather their ideas. Guide them to an understanding that models are "tools that we think with." They represent our ideas about a concept to help us develop an image of it in our minds.
Explain that no particular model is "right," they are just better or worse for helping us in our thinking about density. The reason for showing a number of different models is to help them develop an image or picture in their minds about what density is.
Step 2: Exploring Models of Density: Introducing the Wooden Balls and Marbles Model
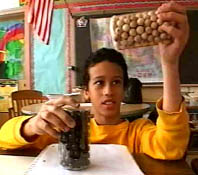
Show the students a clear cylinder full of wooden balls and a clear cylinder full of glass marbles. Each one is filled to the same height. Ask them about their mass and volume.
- Do they think that the volume is the same or different?
- Do they think that the mass is the same or different?
Pass the models around so that they can feel them and can see that the one with the glass marbles has more mass.
 © Annenberg Media |
 © Annenberg Media |
Step 3: Critiquing the Wooden Balls and Marbles Model
Ask, "Is this a good model for thinking about the differences between the two cylinders we looked at in our last lesson?" Briefly discuss what works about the model and what doesn't work.
Some good features/aspects of this model are:
- This model controls for volume and lets students feel and measure differences in mass.
- It shows that you can have the same volume and different masses due to density.
- It lets students think of the balls as particles.
- It offers a way to think about the mass or weight of different particles being different.
- It offers a way to think about the "heaviness" of the kind of material.
- It uses different materials to depict different materials.
- (You and your students may come up with a slightly different list.)
Some negative features/aspects of this model are:
- It doesn't capture the idea of crowdedness. Both cylinders/boxes are just as crowded, even though the objects inside have different masses (and different densities).
- (You and your students may come up with a slightly different list.)
Some neutral features/aspects of this model are:
- In order to represent particles, the marbles and wooden balls should be exactly the same size so that it doesn't seem like particle size accounts for density differences.
- (You and your students may come up with a slightly different list.)
Collect questions or issues that cannot be resolved at this point on the corner of the board or on chart paper. For instance, the issue of whether there is air or space between the particles may arise. Without going to the molecular level, there's no easy way to resolve such questions. They will have a chance to revisit these questions later in the module.
Step 4: Improving the Wooden Balls and Marbles Model
Ask, "How could you improve the wooden balls and marbles model? What would you do to change it?" Have the students collaborate with at least one other student to draw and explain two ideas for how to improve it. Have them work on white boards so that they can make modifications as they listen to other students' improvements.
Have students share and discuss their improvements.
 © Annenberg Media |
Step 5: Exploring Models of Density: Introducing the Dots-Per-Box Model
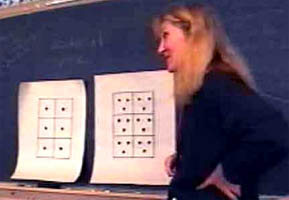
Post a large copy of the Dots-Per-Box model. (Alternatively, you could make a transparency and use an overhead projector.) Ask students to make observations about the different boxes. Ask the students to consider the differences between different sets of boxes. Ask:
- Which one is more crowded? How can you tell?
- Why are we talking about crowdedness?
- What is the link between these crowdedness models and density?
As mentioned in the last lesson, students often have a hard time determining which is more dense, the diagram with more dots or the diagram with fewer dots. Explain that greater density means more dots. The more dots, the more dense the substance is. Fewer dots means less dense.
Step 6: Critiquing the Dots-Per-Box Model
Critique the model together.
Some positive features/aspects of this model include:
- It attempts to show what more or less crowding in a certain amount of space would look like.
- We have to measure or compare the volume and then count the dots to figure out density.
- It is similar to the models used in social studies to think about population density.
- It looks like particles.
- It captures how far apart or close together particles are.
- (You and your students may come up with a slightly different list.)
Some negative features/aspects of this model include:
- It doesn't really offer a sense of how mass is a part of the density equation. (On the other hand, you could think of each little black box as weighing a certain amount, or guess that boxes of the same size with different numbers of dots will have different masses.)
- (You and your students may come up with a slightly different list.)
Step 7: Exploring Models of Density: Introducing the Bread Model
 |
 |
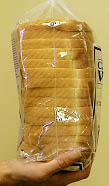
Hold up a loaf of bread. Keep it in the plastic bag throughout the demonstration. Ask students to visualize its density, or the crowdedness between its particles. Give students some thinking time. Have some students describe their ideas.
Show the students how much mass the bread has by weighing it on a pan balance, triple beam balance, or electronic scale. (It can be tricky to fit the bread onto a pan balance.)
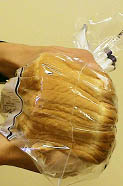
Next, slowly compress the loaf length-wise. That is, stand the loaf on one end and squish downward. Students might notice the bag expand as the air is pushed out of the bread. Ask the students to predict what they think the mass will be now. Will it be the same, greater than, or less than the mass of the bread before you squished it?
Note to Teacher: Take careful note of the students' responses. Some of your students may think that because it is smaller, it will weigh less. This suggests that they are not conserving the amount of matter. However, other students may also think this but for a different reason. They may realize that air is matter and that if you push out the air (as you do when you compress it), the bread should weigh less. Technically, they are correct, but we do not have the instruments to measure this small a change in mass. Also, take note of whether students talk about air in between the bread "particles" or space between the bread "particles".
Weigh the bread to show that its mass did not change (as far as we can measure). What about the volume? Did it change? If so, how? Have students make predictions about crowdedness or density. Did the density change? If so, how? If not, why not? Students should find that the mass of the bread doesn't change but the volume does decrease significantly. Therefore, before the bread is squished, its density is lower, with the stuff inside all spread out. After the bread is squished, its density is higher because you have the same amount of "stuff" (mass), but in a smaller space (volume).
Step 8: Critiquing the Bread Model
Discuss the bread as a model: What works and what doesn't? What could we do to improve the model? What does this model share that helps us understand density better?
Some positive features/aspects of this model include:
- The bread is essentially the same mass/weight before and after it is compressed. The model controls for mass (allowing for a small amount of mass—due to the air inside the bread—to be released when squished), but lets students see visual changes in volume.
- It helps to illustrate how something that is more compact is also more dense because there is more "stuff" in a smaller amount of space.
- It introduces the concept of "mixed densities." That is, it introduces the problem of how to measure density for objects that consist of more than one type of matter. In this case, students must consider the air inside the bread when thinking about its density.
- (You and your students may come up with a slightly different list.)
Encourage the students to grapple with the question of whether air is responsible for density. The bread clearly had air in it. Does all matter have density? Does everything have air in it? The bread is bread plus air. Make sure to engage students in explicit discussion that sometimes the spaces between particles are not air—they are just space. Explain that we will come back to this concept in a later lesson.
Some negative features/aspects of this model include:
- The model may reinforce the notion that what makes something dense is whether or not it has air in it. Once you squish the air out, an object gets denser or more dense. Many students believe that air alone is what determines something's density. The more air inside an object, the less dense it will be.
- While the model provides a good visual picture of "compactness", it doesn't necessarily help students develop a more sophisticated understanding of what's happening on a molecular level. We will come back to this in Lesson 9, Lesson 10, and Lesson 11.
Review, Extend, Apply
Step 9: Making Connections: Thinking About Density in the World
Between this lesson and the next one, ask the students to look at objects around them in the world and try to visualize what their density might be like. They should keep track of questions that come up, for instance, "Does all matter have density?" and so on. Encourage students to think about all different phases of matter and many different kinds of objects.